How to? Nude Lip

A nude lip. The look everyone wants to wear, but few succeed. I found that looking for a perfect nude lipstick is pretty much the same as looking for a perfect foundation. If you go too light, you look pale and lifeless, and if you go too dark or warm, you look older and unnatural. It can be tricky to achieve a perfect nude lip, but not all hope is lost. A few simple guidelines can help you know exactly what to look for the next time you go shopping.
While searching for a lipstick, you have to observe the type of complexion you have, what is your hair color and your eye color. This rule especially applies when choosing nude lipstick. Nude lipstick should blend with the rest of the colors which are unique for your face, hair and eyes. Lips that have red pigment go well with warm nude colors, such as peach. That warm pigment neutralizes the blue undertone. If you put on cold colors, your own lip color will be visible underneath and that will look very unnatural.

Lip care is really important for a nude look to be perfect. Hydrate your lips and keep them smooth. If your lips are chipped, do not use matte shades, but rather sheer or with a cream finish.

Test the color on your hands. Rather than testing it on your lips, test the lipstick on your hands and avoid getting infections. Bare in mind that the nudes with pink pigments will look more pink on your hands, and warm colors will look more neutral on your lips than on your hands.

Valentina.
How to? Highlighters Vol 2.

As I did "How to? Highlighters Vol 1.", where I explained which are the areas of the face (picture above) that you should highlight, it seems only natural that I should do Vol 2. and suggest products that would be best for the job. So, here comes the list of my personal favorites!
LIQUID HIGHLIGHTERS
 This type of highlighters are used as primers or base for your foundation. Shimmery particles will break through your foundation in a very natural way, as long as you do not go overboard with applying this type of primers. What you need to be careful about is avoiding areas of redness or pigmentation, because all that shimmer will just draw attention to the imperfections. Same goes for applying powder highlighters and concealers which reflect light. Also, when choosing highlighters pay attention to your skin tone. If you are naturally pale, pink-ish highlighters will not stand out on your face, but blend in nicely. And if you have warm undertones, go for bronze ones. No matter what your undertone is, choosing a mosaic highlighter is the best option, because it gives you a mix of colors making the whole look seem more natural.
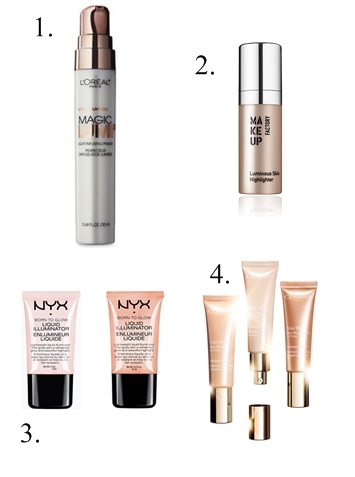
1. L'oreal Lumi Magic Base, is a really affordable highlighter base. However, as it leaves your skin really radiant, it will not do much for the longevity of the foundation.
2. Makeup Factory Luminous Skin Highlighter, comes in 2 shades. What I like about this product is that it blends really nicely. I love the darker shade, because it looks gorgeous as a bronzer during the summer.
3. NYX Liquid Illuminator, comes in 4 shades. Put a small amount on the areas you wish to illuminate, and let it work its magic. Also, very affordable highlighter.
4. Clarins Instant Light Radience Boosting Complexion Base, has 3D pigments and can be used alone or as a primer before foundation.
POWDER HIGHLIGHTERS
What you really want is that highlighters have as small particles as possible. The best thing about this product is the ability of looking fresh and radiant, but in a very natural way. if you feel that liquid highlighters are to much of work or you don't feel confident using them, powder illuminators will be easier to use. They are great, as many of them come in a combination with a blusher as a 2 in 1 type of thing.

1. Lancome Blush Subtil Palette, comes in 11 shades. You have everything you need in one product; contour, blush and illuminate.
2. Illamasqua Gleam, is a cream highlighter. It is also very pigmented, so be careful how much product you are using.
3. MAC Mineralize Skinfinish, adds highlights to face and body.
4. NYX Tango With Bronzing, also comes in mosaic shades. Perfect for sun-kissed skin effect.
Which highlighters are you using? Any new tricks or tips? Let me know :*
Valentina.
Photo: Joanna Paciorek
How to? Highlighters Vol 1.

I know that many of you heard about highlighters, and that even more of you bought it, but do you really know how to use it? If used properly, highlighters can define your face and make it radiant, glowy and overall healthy looking. It is the best accessory for these spring days ahead, when you should drop heavy makeup an let your skin breathe. There are 8 areas on your face where you can apply highlighters:
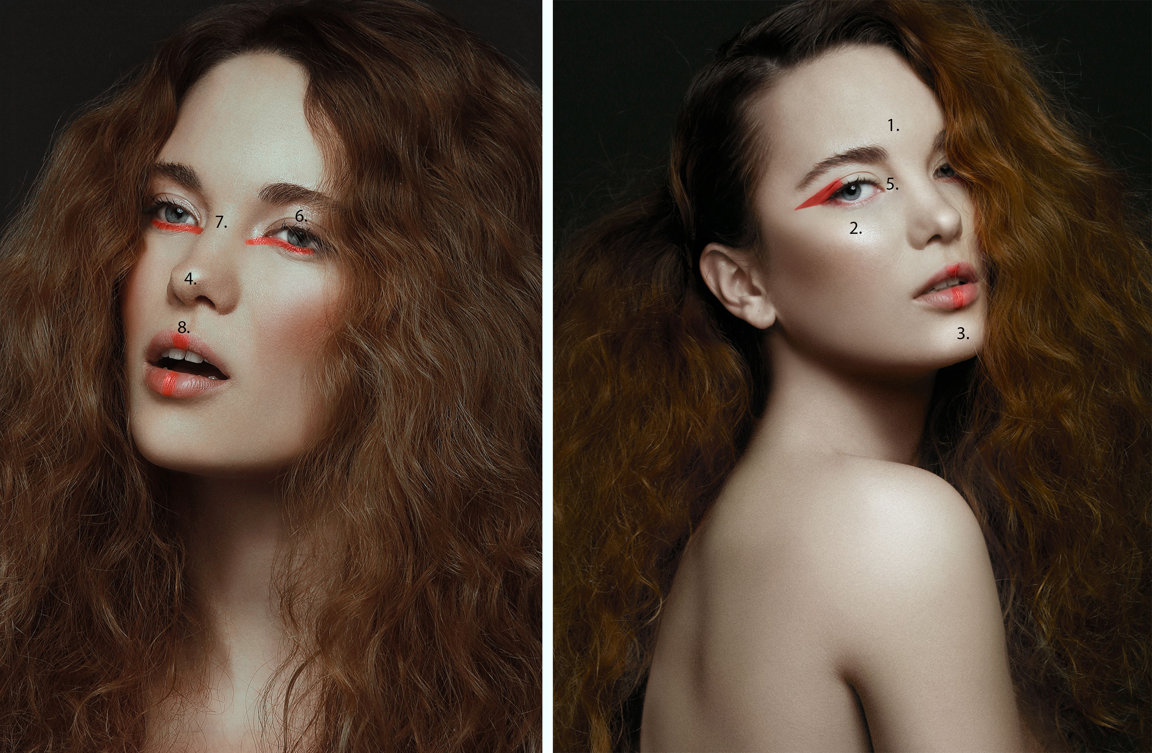
1) The center of your forehead, but you should be careful and avoid this area if you have oily skin. You are going for healthy glow, not oily.
2) This is probably the easiest area to put highlighter on. Usually, the blusher goes first, but no harm will come if you mix up the order. Make sure you put small amounts of highlighter on the top of your cheekbones, do not put it all over your cheeks.
3) Highlighted center of your chin will help balance the face and give it definition.
4) and 7) Putting highlighter on the tip of your nose and in the middle will visually make the nose smaller, thinner and more defined.
5) Corner of your eyes is a very important area. Highlighter will trick others into thinking you had the most amazing sleep last night. So, if you have a problem with dark circles, or you just didn't have the time to get some rest, this will do the trick.
6) Put some highlighter under your eyebrows. This will define your brows and make eyes pop out more.
8) Last but not least, highlight your Cupid's Bow to get that sensual and defined lip.
Valentina
Photo: Joanna Paciorek
Oscars 2016

Oscars! Not only is it the most prestigious movie award, but the whole event turns into most glamorous fashion event of the year. This year celebrities did not disappoint, and I am bringing you the best beauty looks of Oscars 2016. Ladies, take notes!
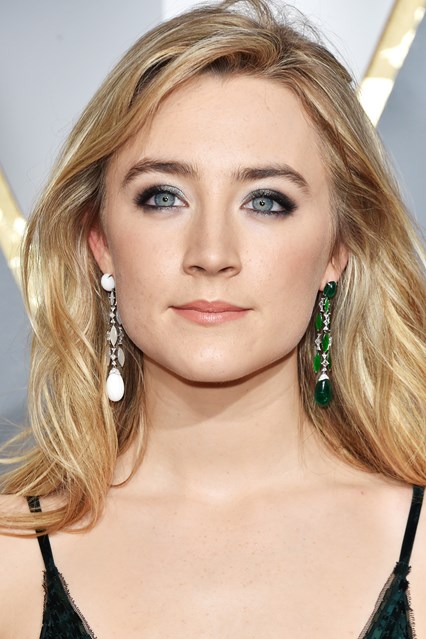
Saoirse Ronan
This look is perfect for blue-eyed ladies who wish to accentuate their eyes. If you have blonde hair and blue/grey eyes, this is the look for you. Saoirse chose smokey metallic look with nude lips and peachy cheeks. To make your eyes pop even more, groom your eyebrows and leave them completely natural.

Rooney Mara
This must be my favorite look of the evening. Rooney has this flawless, almost Snow White kind of complexion. What is important about this type of complexion is that you can rarely do nude or light lip colors without looking too pale. This is why red, purple or any dark color will make the perfect contrast. Rooney chose straight eyebrows, light smokey eye in neutral color and bloody red lips.

Margot Robbie
She is the perfect example that you can look fresh and beautiful wearing almost no makeup. Make your skin flawless and glowing (using highlighters), groom your brows and accentuate your lips. A touch of mascara will do the trick, and you are ready to go.

Lily Cole
All of you redheads out there, search no more! The perfect look for you is here. Lily chose golden/bronze eyeshadow with a thin liner, but you can match your eyeshadow with your hair color. Choose peachy blush and nude lips. If you want focus to be on your lips, groom your brows and put one coat of mascara. Then, choose whatever lip color your love and feel comfortable in.
Valentina.
Source: http://www.vogue.co.uk/beauty/2016/02/29/oscars-2016-best-oscars-beauty
Everything about: Mascara!

Whether you use it every day or just occasionally, there is a lot of science behind a good mascara. Maybe you already have your perfect type, and maybe you are accustomed to that one mascara you keep buying over and over again, but this post is all about finding out if your perfect pick is really perfect.
Everything is in the Brush
I know many of you think well, mascara is just a mascara, all of them are similar. Well, you cannot be more wrong. Although it is true that many brands share the Formula (wax, pigments and film formers), and that that formula has not changed for almost 50 years, it is the Brush that makes a difference between mascaras. A lot of money, time and testing is necessary to make a breakthrough brush, and brands usually keep it a trade secret on how they make a new one. Traditional mascara brushes are either fiber brushes or twisted wire brushes. lately, plastic-molded brushes became very popular because they offer more design options. Depending on the space between the bristles, which serves as a reservoir for extra formula, brushes are designed for either length and separation (Lancome Définicils Waterproof' High Definition Mascara) , or volume and thickness (Maybelline Volume Express). Finely spaced bristles can give you longer eyelashes, and widely separated are for thick ones.
TIP: powder your lashes using baby powder and a cotton swab before application to for an extra volume.


What is the Wiper
The Wiper is a small ring inside the tube of a mascara. It determines how much formula stays on the brush once you take it out. Every brand has a group of scientists who test the wiper in order to find the perfect volume for the effect they want to achieve with the mascara. One millimeter can make a huge difference. If the wiper is too tight, all the formula gets squeezed off the brush. If too wide, you get chunks of mascara on the brush.
TIP: Give your mascara the finishing touch by coating your lashes with clear mascara after application.

Take it off Properly
I am sure you already know that you should clean your face before going to bed, but taking of mascara can be really annoying. Before you start rubbing your lashes, try putting makeup remover on to the cotton pad and gently press onto your lashes for a few seconds. The mascara will become watery and easier to come off. Instead rubbing your eyes, make circular movements which are less harmful and will not damage the lashes. Also, not every day is a Waterproof Mascara Day. Those kind of mascaras are meant to be used only on special occasions. Always read the label and avoid those waterproof mascaras that have no water in them. That means that it is almost impossible to take it off.
TIP: if you do not take off mascara it can cause your lashes to fall off, and a stiff lash can actually scratch your cornea while you’re sleeping.
Do not keep it forever
Among all beauty products, mascara has the shortest lifespan. After 3 to 4 months it is time to get a new one. If you keep it longer than that, the chance of getting an eye infection increases drastically. But, not everything is a waste. You can always keep the brush, clean it and use it to groom your eyebrows.
TIP: Always wait a few seconds for one coat to set before applying another.
Valentina.
Campaign - Yuniku "Bizzare"

Last month my dear friend and work colleague, Lidija Pihler Yuniku, celebrated 10 years of her brand. In that honor she had her new collection presented during the Portanova Fashion Incubator. Naturally, we decided to have a proper photo shoot on the top of Eurodom in Osijek, and here is the result:


I am so proud of you Lidija, love you most. Click here for more photos.
Designer: Yuniku
Photo: Irina and Matej Photography
Make Up: Valentina Roso
Models: Matea V. and Mirjana K.
Location: Osijek, Eurodom
Valentina.
Save or Toss? Makeup Expiration Dates

We have all done it. We have all continued using products after the expiration date has come and gone. But what many of you do not know is that those dates are not merely there to make you buy a new product. Their purpose is much more important. Not only does your makeup become more clumpy and harder to apply, but molecules inside break into something else that can cause serious problems on your skin. There can be signs of irritation which can lead to inflammation and breakout, and when that happens it can be a real trouble to repair it. Expired makeup also carries a lot of bacteria which can cause bumps on your face and infections on your eyes. Unlike food, cosmetic companies are not required to put expiration dates, but there are some tips that can help you decide whether to save or toss makeup.

If you see this little jar with an open lid and a number, it means that when you open the product you have a number of months (M) or years (Y) until the product goes bad.

MASCARA
Lifespan: 2-3 months
When to toss: as soon as you notice it going clumpy and if it smells weird. Also, do not share your mascara as it can transfer bacteria which can cause pink eye.

Liquid foundation and concealer
Lifespan: 6 - 12 months
When to toss: when it separates into layers or changes color. Keep your foundation out of the sunlight, because sun can make it spoil faster.

Lipstick and Lip gloss
Lifespan: 2 years for Lipstick and 1 year for Lip gloss
When to toss: If your lipstick becomes dry and hard to apply, and your lip gloss is extra sticky it is time to replace them

Eyeshadows, Powder and Blush
Lifespan: 2 years
When to toss: All of these powders will become flaky and dry. If you want to prevent bacteria, clean your brushes with a sanitizer or a brush shampoo
Valentina.
How to Survive? Gym and Make-up

We all know that wearing make-up while training can have a bad effect on our skin. So why do we still insist on wearing way too much make-up when visiting the gym?
Intense workout benefits your body and mind, but it can also benefit your skin. Training is the perfect time to let your skin breath and self-clean. When your body gets hot your pores become larger, which means that sweat comes out, but also anything that is on the surface can come in. That means that it is important what you put on your face before workout. If your skin is covered in make-up, all that foundation will clog up your pores and create perfect conditions for black heads, which can break out over a period of time. You may think you look beautiful while exercising, but what happens to your skin is everything except beautiful. Not to mention that after a workout your face looks as if it is melting away.
The perfect thing to do would be to clean your face before workout, and to put on a moisturizing cream which will penetrate quickly - any heavy cream of product will just sweat away. After the workout clean your face again, while your pores are still open. Do not use strong exfoliators, because your skin is most vulnerable when pores are completely open.
For all of you who simply cannot leave the house without make-up, apply light and oil-free moisturizers or foundations, and a coat of waterproof mascara. Moisturizing foundations will not clog your skin with unnecessary oils and will allow sweat to break through.

![]()

Valentina
How to Survive? Facials

Halloween! Part 2

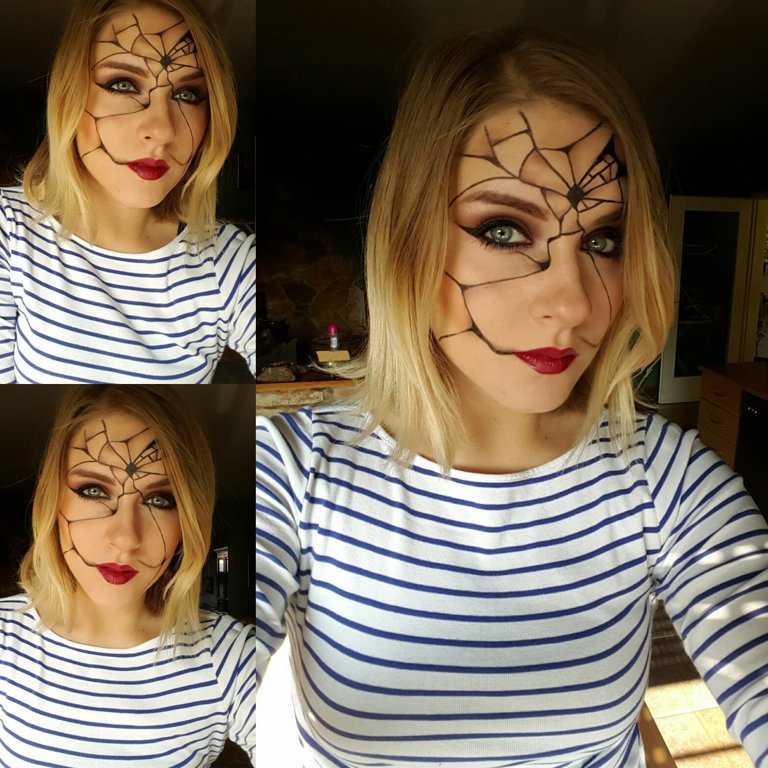
I have had so much fun in the past 6 days. It was challenging, but I think the effort paid off. I really hope I have inspired some of you, that you had a great time creating Halloween masks and that maybe some of you discovered hidden love towards makeup. I wanted to transform myself into characters from my favorite Halloween categories. That is how I created Broken Doll from horror, Fawn from animal, Pop Art from comic, Cruella De Vil from Disney, Sugar Skull from dead and Spiderwoman from superhero category. Next year I will do this project again, and who knows, maybe it will last longer that 6 days. Till next Halloween.
Valentina
Halloween! Part 1
I wish Halloween can be all day, every day. Halloween is in six days, and I will be doing one Halloween mask for each day. If You have any wishes, write them in comments.
Day 1. Broken Doll
And this is what I did in the last 5 years :)


The Hatter and Queen of Hearts


Wooden Doll and Ursula from Little Mermaid

Pop Art
Valentina.
My Autumn Favorites

Use a lot of hydrating products, your face can never get enough of hydration. Unlike the summer, autumn requires creams that are a bit heavier, and your foundation should also be thicker and creamier. Don't forget SPF.


Facefinity has been my favorite foundation for a couple of years now. It has great texture, but looks transparent on the skin. It has thickness but does not feel heavy on the skin.

Autumn is the perfect time for purples, reds and beige colors. Don't be afraid of wearing bold tones. Make your lipstick the centerpiece of your face. Make it simple and clean, the rest of your makeup should be as minimalistic as possible. This autumn is all about the lips.
Valentina.
How To? Exfoliation.
Types of exfoliation.
There is chemical and mechanical exfoliation, and many of your probably underwent that process without even knowing how important it is.
Chemical exfoliation means using liquids which slowly clean your pores and you can usually repeat that process every day, depending on how strong the product is.
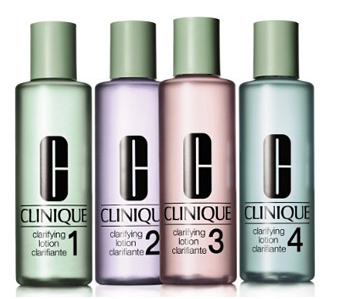
Clinique has great chemical exfoliators which can be used every day, in the morning and in the evening. You can also choose them for different skin types, which makes Clinique exfoliators unique. They are great for sensitive skin and you can feel the effect immediately. Apply it on a clean face using cotton pads, avoid using circular motion, but rather in one direction. They are available in Muller in Croatia.
Mechanical exfoliators, also known as peelings, are thick lotions with particles. Some of them can be used once, and some two times a week. If the particles are bigger you can only use it once a week, and if they are small two or three times a week. You have to be careful when using mechanical exfoliators because overusing it can cause wounds on your skin, and can also make your skin produce too much oil (skin becomes oily), or too little oil (skin becomes dry). Best time to use peelings is right after hot shower when your pores are open. After any type of exfoliation apply moisturizing cream which will go deep into your skin and make it really soft.
![]()
I have been using this peeling for a long time now. It is great for sensitive skin that is prone to black heads. Even though they say it is safe to use ever day (because it has really small particles), I would recommend using it two times a week. You can also combine it with facial cleansing brushes. Both available in Muller and DM.
Valentina.
How To? Perfect Foundation.

Know your skin type. There are four basic skin types: dry, normal, combination and oily. Dry skin has almost invisible pores, it is rough, it lacks elasticity and has more visible lines. Normal skin is neither dry nor oily, it has few or almost no imperfections, no visible pores and looks very healthy and radiant. Combination skin is most common. It is usually normal on the cheeks and oily on your T-zone (forehead, nose and chin). This skin type can produce black heads and dilated pores. Oily skin produces a lot of oil all over your face, pores are really dilated, but the lines are almost invisible. The downside of this skin type is that it is prone to black heads and blemishes if not treated properly. If you want to test your skin type, wash your face in the morning (just water) and dry it with a towel, than watch if it becomes oily during the day. If it doesn't, your skin is probably normal or dry, and if it does, observe where the oiliness occurs. Match the foundation with the season. Spring and summer are ideal for a light wear, hydrating foundations. Your skin produces extra oil during warm periods, your pores are more dilated so you should let the skin breathe. Make sure that your foundation has an SPF, at least 25, which will prevent the sun from aging your skin. During cold weather your skin needs extra care since it can dry quickly. You can choose foundation which is a bit heavier, but also hydrating, because water molecules go deep into your skin and give it elasticity and softness. SPF cannot hurt in those months either. Protect your skin all year long and prevent it from aging too quickly. Know where to test the color of your foundation. Many women have a bad experience when choosing foundation. They usually end up buying the one that is too dark or too orange for their skin. That is because most women test the color on their hands, which is completely wrong. You wash your hands and your face a lot, which results in having lighter skin color on those areas. The perfect place to test the color is on your neck, right under your chin. The color should match your neck more than it should match your face, because your face is usually a bit lighter.
Valentina